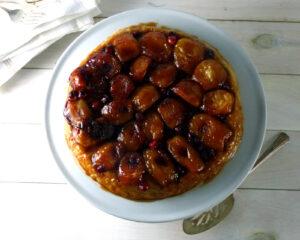
As the holiday season approaches, we ponder ideas for festive menus. For a truly memorable dessert, I suggest a French classic: tarte Tatin. It’s an upside-down tarte showcasing a topping of glistening caramelized apples.
Many years ago, while I was studying cooking in Paris, I had the opportunity to work in a cozy family-run bistro called Chez Gérard. We served satisfying dishes like pot au feu (boiled beef and vegetables), roast chicken, gratin Dauphinoise (like scalloped potatoes but so much better), crème caramel—and tarte Tatin. I was tasked with preparing the tarte.
First I smeared softened butter in the traditional tin-lined copper tarte Tatin pan. (Copper is an excellent heat conductor ensures even cooking.) I sprinkled sugar over the butter and then arranged apple halves (always Golden Delicious, which hold their shape well) in the pan. I set the pan over a burner and let the apples cook gently until they started to caramelize. Then I placed a sheet of pasty over the apples and transferred the pan to the oven. Once the pastry was crisp and golden, I inverted the tarte onto a serving platter to reveal the burnished apple topping.
While the origins of many recipes are shrouded in legend, the creation of tarte Tatin can be attributed to the sisters Caroline and Stéphanie Tatin, who ran the Hotel Tatin in the Loire Valley during the 1880s. The full name for the recipe is La Tarte des Demoiselles Tatin. It is believed that the recipe was created by accident. Stéphanie had intended to make a traditional apple tarte but left the apples cooking in butter and sugar too long. To rescue the situation, she topped the apples with pastry and finished it in the oven. She served the tarte upside-down, and voilà—a classic was born!
I have taken a little liberty with the traditional recipe. To incorporate a taste of Vermont, I substitute maple syrup for sugar, and I sprinkle in tart cranberries to balance the sweetness. I also add walnuts, which are delicious caramelized in maple syrup. My trusty cast-iron skillet replaces the beautiful copper tarte Tatin pan (my wish list, Santa?). Cast iron also works beautifully because it conducts heat evenly and it goes from stovetop to oven seamlessly. It is important to use firm apples—you don’t want to make applesauce. I’ve tested the recipe with Golden Delicious, Ginger Gold, and Jonagold varieties.This tarte is most impressive when served the day it is baked (leftovers are still delicious), but you can make the pastry ahead of time, roll it out, and store it in the freezer. At baking time, slide the frozen pastry over the caramelized fruit, and pop the tarte into the oven.
Merci les Demoiselles Tatin!
Yield: 1 tarte, 10 servings
Equipment: 10-inch ovenproof skillet, preferably cast iron; sturdy oven mitts.
Ingredients
Crust:
3/4 cup all-purpose flour
3/4 cup whole-wheat pastry flour or white wheat flour
2 tablespoons sugar
1/4 teaspoon salt
5 tablespoons (2½ ounces) cold unsalted butter, cut into small pieces
1 tablespoon vegetable oil
1/3 cup ice water
1 large egg yolk
1 teaspoon lemon juice or distilled white vinegar
Maple-Apple Topping:
1/4 cup unsalted butter (2 ounces, 1/2 stick), softened
1/2 cup amber-color, rich taste maple syrup
2 pounds Jonagold, Ginger Gold or Golden Delicious apples (4–7 apples) peeled, cored and quartered
1/2 cup fresh or frozen cranberries
1/2 cup walnuts (2 ounces), coarsely chopped
Whipped cream, crème fraiche, or vanilla ice cream for serving
Preparation
1. To prepare crust: Whisk all-purpose flour, whole-wheat flour, sugar, and salt in a medium bowl. Cut in butter with a pastry blender or your fingertips until the mixture resembles coarse crumbs with a few large pieces. Add oil and stir with a fork to blend. Mix water, egg yolk, and lemon juice (or vinegar) in a measuring cup. Add just enough of the egg yolk mixture to flour mixture, stirring with a fork, until dough clumps together. (Add a little water if dough seems too dry.) Turn the dough out onto a lightly floured surface and knead several times. Form dough into a ball, then flatten into a disk. Wrap in plastic wrap and refrigerate at least 1 hour or up to 2 days.
2. Invert the skillet you will using onto a sheet of parchment or wax paper. Trace the perimeter of the skillet with a pencil. Cut out the circle. This will be your template for cutting the pastry round. Line a baking sheet with another sheet of parchment paper or wax paper. On a lightly floured surface, roll the dough into a circle, slightly less than 1/4-inch thick. Using sharp knife and your template as a guide, cut out a circle. Roll pastry back over rolling pin and transfer to the prepared baking sheet. Cover pastry with plastic wrap and freeze until solid, at least 20 minutes.
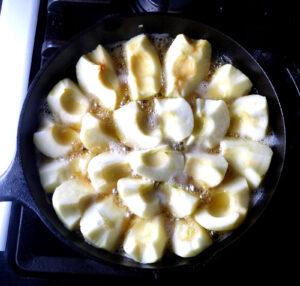
3. To prepare topping and bake tart: Preheat oven 425°F. Smear butter over bottom and partway up the sides of a 10-inch ovenproof skillet. Pour in maple syrup, and tilt to coat bottom evenly. Arrange apples snugly, rounded sides down, over the maple syrup. Place the skillet over medium-high heat and cook until the maple syrup begins to thicken and darken slightly, 10 to 20 minutes. Remove skillet from the heat. Sprinkle in cranberries and walnuts, letting some of them fall through the crevasses to the base of the skillet. Carefully ease the frozen crust over the fruit.
4. Place the skillet in the oven, and bake for 10 minutes. Reduce heat to 375°F and bake until crust is golden brown, 15 to 20 minutes. Immediately, wearing oven mitts, grasp the skillet and serving platter together, and invert the tarte onto a platter. It is important to unmold the tarte immediately because as it sits, the caramel will harden and cause the topping to stick. Replace any pieces of fruit or walnuts that cling to the skillet, and spoon any syrup remaining in the skillet over the apples. Let cool. Serve warm or at room temperature with whipped cream, crème fraiche, or ice cream, if desired.
Per serving (without cream or ice cream): 310 calories, 3g protein, 40g carbohydrates, 3g fiber, 16g total fat, 7g saturated fat, 50mg cholesterol, 60mg sodium.
To make ahead: Make the crust through Step 2. Cover with plastic wrap, then foil, and store in the freezer for up to 1 week.
Patsy Jamieson


